Posts

Showing posts with the label Doosan DX300LC Trouble Repair

How to Disassembly Swing Motor for Doosan 300LC Excavator

Image
This instruction show you guide on how to disassembly swing motor for Doosan 300LC excavator.   Preparations; Doosan Diagnostic Tool Doosan DMS-5 Doosan Diagnostic Software   Steps; 1. Remove hex socket head bolt and disassemble time delay valve assembly, beginning with rear cover (19). 2. Remove rear cover from body (1) by removing hex socket head bolt (23) of its assembly with impact.

Doosan DX300LC Excavator Slipper Seal Straightening Jig Assembly

Image
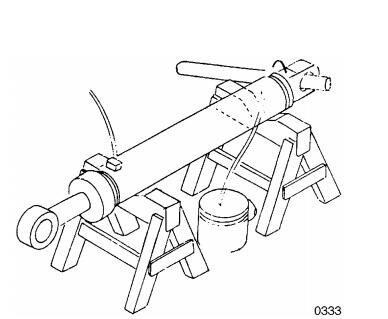
This instruction show you guide on how to assemble slipper seal straightening Jig Doosan DX300LC excavator. Procedures: 1. Following removal of cylinder from excavator attachment,support cylinder on some type of sturdy work platform and drain all oil. Rotate cylinder so that piping ports are on top,to allow trapped air to vent. Doosan DMS-5 Diagnostic Software 2. Position piston rod so that it is extended approximately one half meter (20"). 3. Remove bolts (7) on the end of cylinder. NOTE: Wrap a cloth or other protective material around piston rod, to avoid possibility of accidentally scratching or scoring rod surface while fasteners are being loosened and removed.

Doosan DX300LC Excavator Center Joint Swivel Disassembly

Image
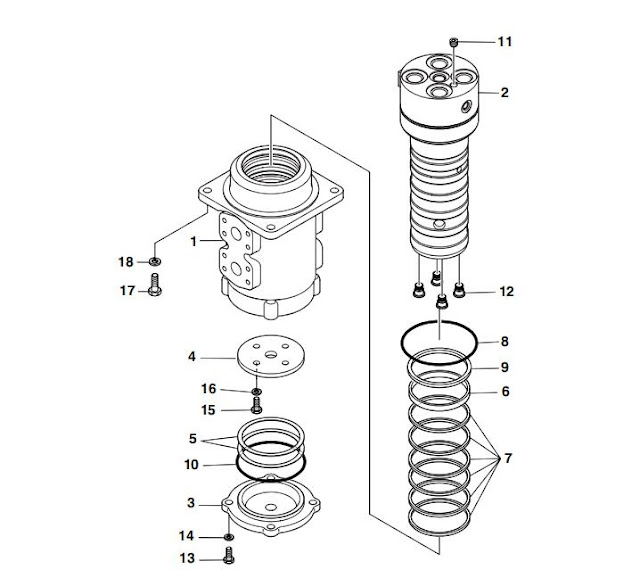
This instruction show you guide on how to perform flow meter and kit installation and test for Doosan DX300LC excavator. Procedures: 1. Clean off the exterior of the swivel joint after it has been removed. 2. Scribe or otherwise mark a line across the cover and the body of the center joint, to allow reassembly in the same configuration. Doosan DMS-5 Diagnostic Software 3. Unbolt the four 12 mm fasteners holding the cover. Use a vise or V-block to hold the assembly in place.

Doosan DX300LC Excavator Flow Meter and Kit Installation/Test

This instruction show you guide on how to perform flow meter and kit installation and test for Doosan DX300LC excavator. Doosan DMS-5 Diagnostic Software Procedures: Checking regulator and pump output, to assess the output balance between the front and rear pumps and to verify operating adjustment of each regulator, will require installation of a flow meter. The After Sales Service department of the nearest local DOOSAN dealer can assist you with these tests or, if you prefer carrying out your own testing, they should be able to help in putting together a hose and fitting kit (or the required dimensions and specifications for hoses and fittings) to allow you to install a flow meter downstream from the main pump assembly.

Doosan DX300LC Excavator Upper Roller Reassembly and Disassembly Guide

Image
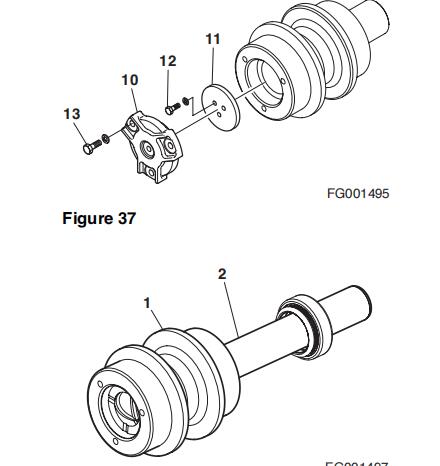
This instruction show you guide on how to reassembly and disassembly Upper Roller for Doosan DX300LC excavator. Procedures: Upper Roller Disassembly Doosan DMS-5 Free Download 1. Remove the plug (9, Figure 36) from the cover and drain oil. 2. Remove the bolts (13, Figure 37) and cover (10). Detach bolts (12) and washer (11). 3. Separate the roller (1, Figure 38) from the axle (2). 4. Separate the floating seal (6, Figure 39) from the roller. 5. Separate the O-ring (8) and thrust ring (3) from the axle. 6. Separate the bushing (4 and 5, Figure 40) from the roller with a press and special tool (ST-1919). Upper Roller Reassembly 1. Degrease, clean and dry all parts before reassembly. Insert bushing (4 and 5, Figure 41) into the roller (1). Doosan EPC Download 2. Insert floating seal (6, Figure 42) into the roller (1) and bushing. NOTE: Apply clean engine oil to the joint side of the floating seal. Apply grease to the floating seal O-ring. 3. Install the axle (2), O-ring (8) and thrust ri...

Doosan DX300LC Excavator Lower Roller Reassembly and Disassembly Guide

Image
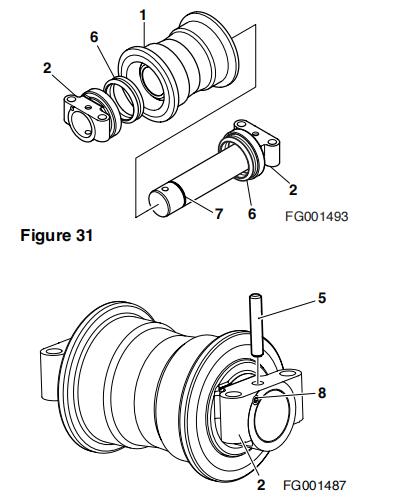
This instruction show you guide on how to reassembly and disassembly lower roller for Doosan DX300LC excavator. Doosan DMS-5 Download Procedures: 1. Degrease, clean and dry all parts before reassembly. Insert bushing into roller. https://www.car-auto-repair.com 2. Apply grease to the O-rings (7, Figure 29) and insert into axle. 3. Align collar (2, Figure 30) and axle (3) pin holes and pin (5) the collar. 4. Insert floating seals (6, Figure 31) into the roller (1) and collar (2). NOTE: Apply clean engine oil to the joint side of the floating seal. Apply grease to the floating seal O-ring. 5. Slide the axle inside the roller. 6. Install the collar (2, Figure 32), O-ring (7), and pin (5) on the remaining side. 7. Fill with clean engine oil with approximately 480.0 cc (16.2 oz). 8. Install plug (8, Figure 32) on the collar. Doosan EPC Lower Roller Installation 1. Install four bolts to hold lower roller assembly to track frame. NOTE: To gain access to some rollers a link guard may have to b...

Doosan DX300L Excavator Front Idler Roller Disassembly Guide

Image
This illustration show you guide on how to disassemble front idler roller for Doosan DX300L excavator. Procedures: 1. Remove plug (9, Figure 15) from idler assembly (1), and drain into a suitable container. Doosan DMS-5 Diagnostic software 2. Separate the pin (6, Figure 16) from the bearing (3). 3. Use a press to remove the bearing from the axle (4). Separate the O-ring (8, Figure 17) from the axle.

How to Remove Track for Doosan DX300L Excavator

Image
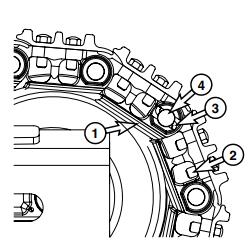
This illustration show you guide on how to assemble track for Doosan DX300L excavator. Procedures: 1. Position machine on a smooth level surface with adequate room for forward and reverse travel. 2. Relieve track tension. Refer to "Track Tension" in this section for procedure. 3. Move machine until master link (1, Figure 8) is positioned nat approximately 10 o'clock from top position on front idle roller. Doosan DMS-5 4. Remove four nuts and bolts (2, Figure 8) holding shoe to link. Remove enough shoes to make access to lock pin easier.

How to Assemble Carrier for Doosan DX300L Excavator

Image
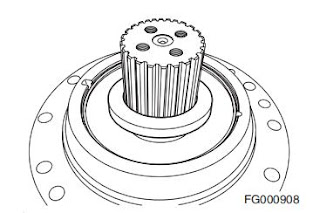
This illustration show you guide on how to assemble carrier for Doosan DX300L excavator. Doosan Data Monitoring System DMS-5 Free Download 2020 Doosan Excavator Workshop Manual Procedures: 1. Using a suitable lifting device, lower No. 2 carrier assemblyinto ring gear, making sure that planetary gears are engaged. Continue to lower carrier and engaging it onto splines of pinion shaft. Make sure that carrier is resting on bearing.   NOTE: Make sure that carrier and drive shaft can rotate.

Doosan DX300L Excavator Ring Gear Assemble Guide

Image
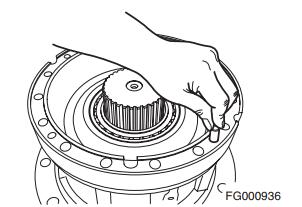
This illustration show you guide on how to assemble ring gear for Doosan DX300L excavator. Doosan DMS-5 Diagnostic Software Procedures: 1. Insertion of lock pin. Insert four lock pins in four reamed holes of case flange. Tap them into place, by gently hitting them with a softface hammer.  

Doosan DX300L Excavator Seal and Bearing Assemble Guide

Image
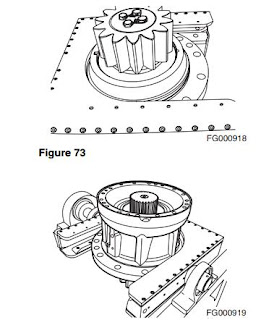
This illustration show you guide on how to assemble seal and bearing for Doosan DX300L excavator.   Procedure: 1. Postion case so that pinion gear is pointing down. Doosan DMS-5 2. Make sure that there is no foreign substance left on seal assembly, apply grease to and around lip of oil seal (TC5001300) as in Figure 75 and Loctite #609 to its external part.  

Doosan DX300LC Excavator Main Case Assemble Guide

Image
This instruction show you guide on how to assemble main case for Doosan DX300LC excavator. Doosan Data Monitoring System DMS-5 Free Download Procedures: Cleaning Casing and Other Parts Steam clean case and other parts, to remove any foreign substances. • Cleaning fluid: PK6540 (alkali) • Liquid density: 3 - 5% • Liquid temperature: 60° - 70˚C (140° - 158°F)

Doosan DX300LC Excavator No.1 Carrier Subassemblies Assemble Guide

Image
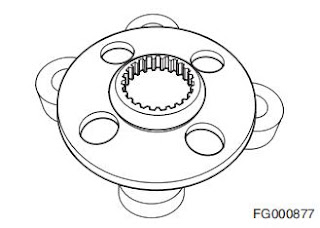
This instruction show you guide on how to assemble No.1 carrier subassemblies for Doosan DX300LC. Preparations: Doosan DMS-5 Diagnostic Software Doosan EPC Download Procedures: 1. Put No. 1 carrier on assembly jig 2. Align No. 1shaft with hole and press it into place.

Doosan DX300LC Excavator Swing Reduction Gear Disassemble Guide

Image
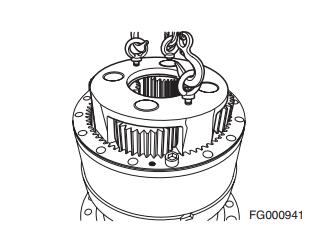
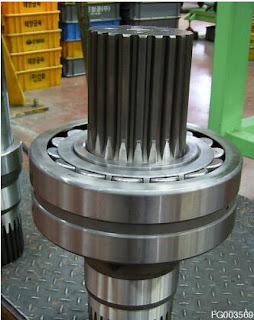
This instruction show you guide on how to disassemble swing reduction gear for Doosan DX300LC excavator. Doosan Data Monitoring System DMS-5 DMS-3 Free Download Procedures: 1. Remove bolts and motor from swing reduction case. CAUTION:The motor should be separated without damage or any foreign substance. 2. Remove level pipe from cover. 3. Remove bolts and cover from case. CAUTION! Care should be taken not to damage mounting surface of cover. Carefully remove all gasket material from mounting surfaces. 4. Remove No. 1 sun gear from No. 1 carrier. CAUTION:Care should be taken not to damage teeth of No. 1 sun gear. 5. Remove No. 1 carrier. 6. Remove washer and No. 2 sun gear Care should be taken not to damage teeth of No. 2 sun gear. 7. Install eye bolts in No. 2 carrier and remove it from ring gear. 8. Install eye bolts in ring gear and remove it. Care should be taken not to damage mounting surfaces of ring gear and case. Carefully remove all gasket material from mounting surfaces. Doosa...

How to Remove Swing Reduction Gear for Doosan DX300LC Excavator

Image
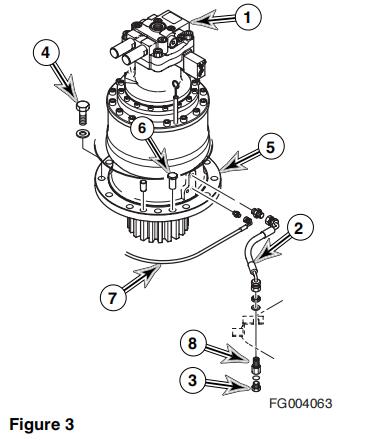
This instruction show you guide on how to remove swing reduction gear for Doosan DX300LC excavator. Procedures: 1. Park on firm and level ground. 2. Lower front attachment (bucket) to ground. 3. Shut down engine.

How to Rebuild Swing Bearing for Doosan DX300LC Excavator

Image
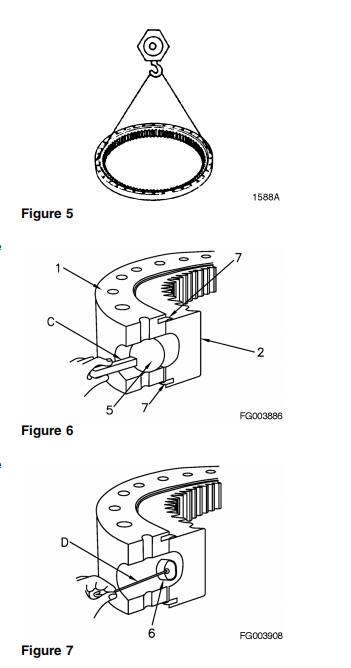
This instruction show you guide on how to rebuild swing bearing for Doosan DX300LC excavator. Procedures: 1. Remove tip of tapered pin (3, Figure 3) using grinder and tap lightly to remove debris. 2020 Doosan Excavator Workshop Service Repair Manual PDF Download 2. Remove plug (4, Figure 4) using a M10 x 1.5 bolt.  

How to Install Fuel Tank for Doosan DX300LC Excavator

Image
This instruciton show you guide on how to install fuel tank for Doosan DX300LC excavator. Procedures: 1. Install two 12 mm eyebolts in threaded holes (38 and 39,Figure 14). Using a suitable lifting device, sling eyebolts. 2. Set fuel tank (1, Figure 14) into position. Install six bolts (7) and spacers (13) finger tight, to secure tank to frame.

How to Remove Fuel Tank for Doosan DX300LC Excavator

Image
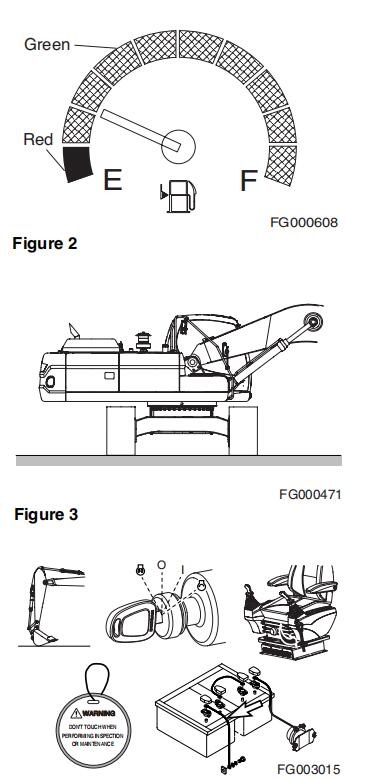
This illustration show you guide on how to remove fuel tank for Doosan DX300LC excavator. Procedures: 1. Look at fuel level display (Figure 2) on instrument panel in operator's cabin to see what it displays. The display is divided into ten separated segments, each representing 10 percent of total fuel supply. Also, look at level gauge on side of tank to estimate volume of fuel left in tank.

Doosan DX300LC Excavator Cylinder Performance Tests Guide

Image
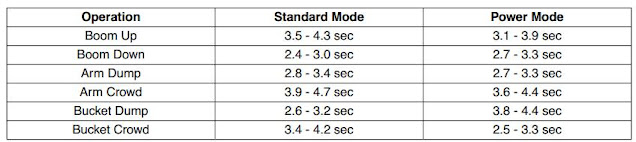
This instruction show you guide on how to do cylinder perform test for Doosan DX300LC excavator. All tests are performed with standard boom, arm and bucket configuration. The bucket should be empty.

Doosan DX300L Excavator Swing Speed & Deceleration Force Test Guide

Image
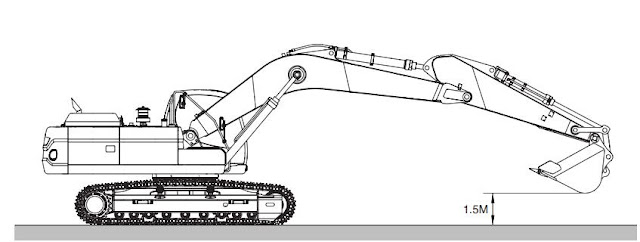
This instruction show you guide on how to perform swing speed and deceleration force test for Doosan DX300LC excavator. Extend the bucket cylinder completely and retract the arm cylinder, as shown in Figure 6, to test swing speed. The lowest point of the bucket will be approximately 1.5 m (3') off the ground.